Monthly Archives: July 2014

Soups Round 1: Homemade Chicken Tortilla Soup

So I was finally able to do it… I branched out from Cauliflower! This week I am bringing you a series on healthy, homemade soups. Over the next few days, I will have 3 different soup recipes for you that are delicious, fairly easy to make, and will satisfy the whole family any time of year.

I really love making soups because I can prepare the meal ahead of time, and just leave it to simmer on the stove until everyone is ready to enjoy. With it being so hot these days, I prefer to prepare the meal in the morning and have everything ready so when it gets closer to meal time, I can just throw everything together and let it cook.

The first of the three soups is a new favorite of mine. I made this for the first time this past weekend, and I am just so eager to share it with you!

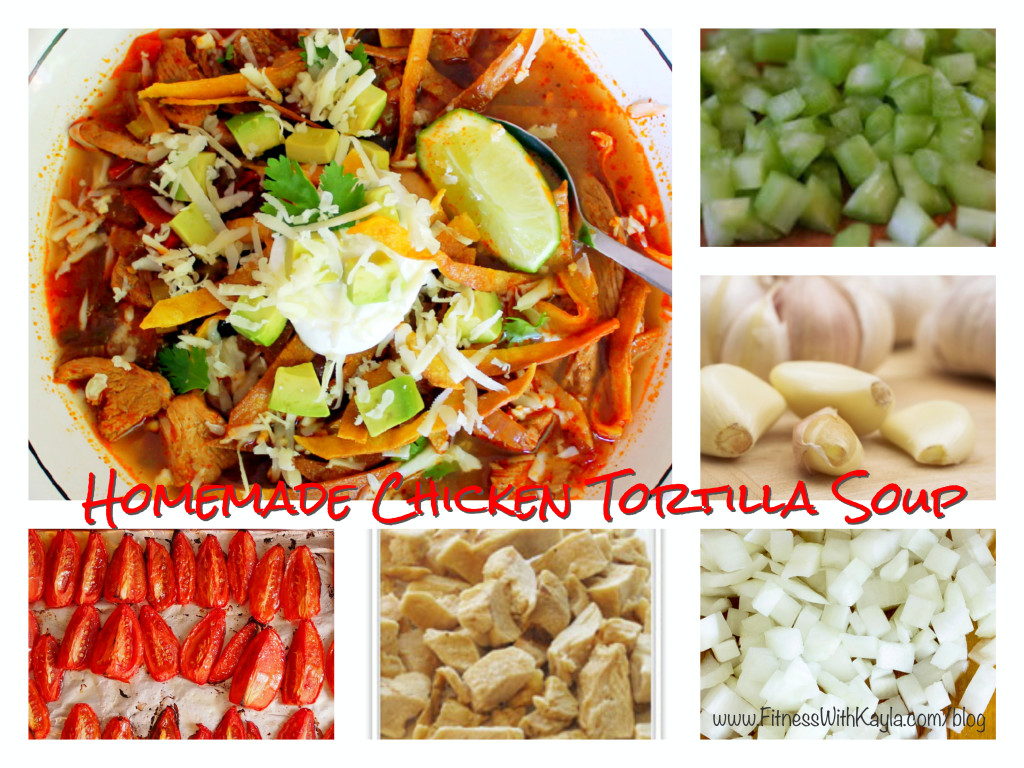
So for Round 1, I share with you… Homemade Chicken Tortilla Soup:

homemade chicken tortilla soup fotor

The key to this recipe is the oven roasted tomatoes. Getting hungry yet? Well here’s the recipe:

Ingredients:

8- whole Roma Tomatoes, quartered

3 tbsp- Olive or Garlic Oil

1- medium Onion, diced

3 stalks- Celery, diced

1- Jalapeño, diced (or more for added spice)

4 cloves- Garlic, minced

4 cups- Chicken broth- (I use Bouillon cubes with water)

Juice of one Lime

2 tsp- Cumin

2 tsp- Paprika

1 tsp- Salt

1 Bay Leaf

2-3 boneless, skinless Chicken Breasts, diced, uncooked

Garnish with Tortilla Chips, Light Sour Cream, Diced Avocado, Lime Wedges & Shredded Cheddar or Monterrey Jack Cheese

Instructions:

1- Preheat oven to 350 degrees.

2- Wash tomatoes, quarter them, and remove some of the seeds. Toss tomato quarters with 1 tablespoon olive/garlic oil and place in a single layer on a baking sheet. Roast for 30 minutes.

3- While tomatoes are roasting, heat 2 tablespoons of olive/garlic oil in stock pot over medium heat. Add onion, celery, and jalapeño. Stir occasionally and cook for about 8 minutes until vegetables are soft and translucent.

4- Add the chicken breast , garlic, cumin, paprika, and salt and sauté for another 6 minutes. Add the chicken broth, lime juice, and bay leaf and bring soup to a gentle simmer. Add tomatoes when they are finished roasting and simmer soup gently for about 45-60 minutes, stirring occasionally.

5- Serve soup topped with tortilla chips and your choice of other garnishes. (I serve each bowl individually, and usually garnish with tortilla chips, shredded cheese, 1 tbsp of light sour cream, diced avocado, and a lime wedge.) Serve Immediately.

So there you have it… Homemade Chicken Tortilla Soup. Here is the link to your printable recipe card: Homemade Chicken Tortilla Soup

As I said before, one wonderful thing about this soup is that the longer you simmer it, the more it enhances the flavor… And by the way, it reheats well for leftovers the next day.  Well, I hope you enjoy this recipe as much as my family does. Stay tuned for the next 2 soups in my Homemade Soup series.

That’s all for now. Enjoy 🙂
A little view of Aqua Aerobics…

Over the last month and a half, I have been teaching Aqua Aerobics in… PARADISE. It’s ok, be jealous… but guess what, you can join in too!

OLYMPUS DIGITAL CAMERA

I decided that it was time to share two little clips from classes, just so everyone can see what we are doing over here!

The first two video are from our afternoon class, which is at 4pm on Tuesdays and Fridays. The third video is from our newly added morning class at 10am on Thursdays. The schedule is still tentative, so as always, keep an eye on my Facebook page, Fitness With Kayla, for the weekly schedule. (Link to my Facebook page: https://www.facebook.com/fitnesswithkayla ) At anytime, feel free to drop me an email at FitnessWithKayla@gmail.com for any questions, comments, or concerns!

I hope that everyone back home enjoys these little clips. I wanted you all to see what I’ve been up to lately… And for everyone here in Mexico, I hope to be able to inspire you. Push yourself, and take a step out of your comfort zone. Come and join us for class, and see for yourself the fun we are having being active and healthy!

Ok here you go… Check it out these videos, and enjoy the VIEW!

This is the afternoon class warm up clip.


This is a little conditioning clip from the afternoon class:


And this is the morning class clip:


Thanks for taking the time to check out the video clips. I greatly appreciate all of the support! I have to credit and thank my wonderful fiancé, Logan, for the videotaping. I hope you enjoyed these brief clips. Each class is 40 minutes in the pool, followed by an optional 15 minute AB class. These ladies have really worked hard, and pushed themselves out to get up and be active. I hope I can be an inspiration, and challenge each and everyone one of you to make the choice to be healthy and active.

Well, thats all for now… Until next time… Enjoy 🙂

Cheesy Cauliflower & Chicken Casserole

I’m starting to believe I have an addiction to Cauliflower. As I have been trying to continue with lots of healthy recipes, I keep going back to using Cauliflower as or in my main dishes. I came across a recipe similar to this on Pinterest, so I had to try it out… but of course I added a few of my own touches. This recipe is quick and easy to prepare, and it bakes in one dish, for less mess and clean up. Its hard to go wrong when combining cauliflower with cheese and chicken, and when you throw in a few other veggies, it makes a delightful casserole for everyone to enjoy.

So here you have it:

Cheesy Cauliflower and Chicken Casserole Fotor

Ingredients:

1 1/2 breasts Chicken, cooked and diced

1 head Cauliflower, steamed and chopped

6 ounces Cheddar Cheese, shredded

6 ounces Monterey Jack Cheese, shredded

1 Egg

1/2 Onion, diced ( You can also substitute Green Onions)

4 slices Turkey Bacon, crumbled

1 clove Garlic, minced

1/2 Jalapeño, diced (optional)

Salt & pepper

Instructions:

1- Preheat oven to 350 degrees.

2- Steam cauliflower until tender. In a separate sauce pan, place uncooked chicken breasts, 2 cups of water, and 1 cube of chicken bouillon. Bring to a boil, and simmer until cooked through. 

3- Meanwhile, combine cheeses in a large bowl. Remove ¼ of cheese and set aside. (*I use a pre-packaged cheese blend to save time.)

4-Once chicken is cooked, remove from water, and allow to cool for 10 minutes. Once cooled, dice chicken, then mix chicken, onion, bacon, garlic, and jalapeño together with remaining cheese.

5- Stir cauliflower into cheese mixture, and add the egg. Mix all ingredients well, and season with salt & pepper. Pour into a 8×8 or larger glass baking dish sprayed well with non stick cooking spray.

6- Bake for 25 minutes, or until cheese is well melted and casserole starts to bubble. Remove from oven and top with additional cheese.

7- Return to oven and bake for an additional 15 minutes. Serve immediately!

Here is the link to your printable recipe card: Cheesy Cauliflower and Chicken Casserole

So this recipe is super simple to prepare, as you mix it all together and bake it. You can omit the 1 egg, but the casserole will not stay together as well. I prefer it with the egg, as it made the flavor better. I hope you enjoy this simple casserole with cauliflower and chicken… It really is YUMMY! In the next weeks, I am going to (well, try to) branch out and bring you some healthy recipes with Spinach, Broccoli, and much more! Stay Tuned, but for now, ENJOY! 🙂

Layered Taco Dip

Craving Mexican tonight, but want something low calorie?? Give my Layered Taco Dip a try. We had this last night for dinner, and it was GREAT! This dish is great because you can use it as an appetizer, as a meal, or even a great dish to bring to a party! My favorite part is it can be low carb, and vegetarian… OR you can add in some hamburger or chicken meat and serve it with tortilla chips!

layered taco dip_Fotor_Fotor

So for the Vegetarian Version:

Omit the meat. Instead of cooking the meat with the Taco Seasoning, mix the Taco seasoning in with the Light or Low Fat Sour Cream.

For Low Carb:

Serve the Taco Dip on a Lettuce Leaf or just eat it as is!

Other options:

Instead of using Hamburger meat, try using either Ground Turkey meat, or diced Chicken. If you do not like particularly spicy food, either cut the amount of jalapeños in half, or omit completely. Use your favorite salsa on the side to add even more yummy flavor to this simple Mexican dish!

Here is the full recipe:

Ingredients:

1 lb Ground Hamburger or Turkey Meat

1 envelope Taco Seasoning (I use Old El Paso)

8oz Light Sour Cream

1 16oz can Refried beans

1/2- 1 cup sliced pickled Jalapeños 

1 cup Shredded Cheddar Cheese

1 cup Shredded Monterey Jack Cheese

1 cup Lettuce, shredded

1 Large Tomato, diced

1/2 cup Onion, diced

Instructions:

1- Cook hamburger meat in a skillet until cooked through. Add taco seasoning and 2/3 cup water, and cook on low for another 10 minutes. 

2- On a large plate, spread refried beans, topped with a layer of sour cream. Add cooked hamburger meat followed by a layer of jalapeños.

3-Add a layer of mixed cheese (1 1/2 cup total), followed by a layer of each lettuce, tomato, and onions. Top off with final 1/2 cup of cheese, and any leftover jalapeños. 

4- Serve immediately, or refrigerate for 30 minutes to cool, depending on preference!

*Amount of jalapeños will vary depending on your spice preference. **If not using meat, mix taco seasoning into sour cream!

Check out a printable recipe card of the full Layered Taco Dip Recipe here: Layered Taco Dip

I hope you enjoy this recipe as much as we do. Give it a try and let me know what you think! Feel free to submit your comments here on the blog or on my Facebook page, Fitness With Kayla. Enjoy 🙂

Spice Up Your Cauliflower- Round 3- Side Dishes

Today, I am moving on from main dishes, and going to give you 2 side dish recipes for Cauliflower. The first one is very simple and the second is a new twist on the Broccoli Bites that I posted last week!

Side Dish 1:

Cauliflower Melt

1/2- Head Cauliflower, boiled, drained, and cut into florets

1/4- cup Cheese of your choice. I use cheddar and parmesan

1- tsp Garlic Salt (or to taste)

1- tsp Ground Pepper (or to taste)

Place the Cauliflower florets in a microwave safe bowl. Cover the cauliflower with 1/2 of the cheese, salt and pepper, and mix through. Place in microwave for 30 seconds, and slightly melt the cheese. Remove cauliflower from microwave and stir, so cheese is blended well through the cauliflower. Top the cauliflower with the remaining cheese, and return to microwave for 45 seconds to 1 minute (until cheese is fully melted.) Serve immediately, as a quick, easy, and healthy side dish to any meal! Goes great with Chicken and Fish!


Side Dish 2:

Cauliflower Balls

OLYMPUS DIGITAL CAMERA

1- head of Cauliflower, steamed and finely chopped

1 cup- Grated Cheddar or Monterey Jack Cheese

3 egg whites

Garlic Salt and Pepper (about 1 tsp each)

1/4-1/2 diced Jalapeño – omit for less spicy option

1/2 cup Italian Breadcrumbs

Preheat oven to 350 degrees F. Mix all ingredients together in a medium sized mixing bowl. With the mixed ingredients, form 1 inch sized balls, making sure all ingredients are well combined. Place cauliflower balls on cookie sheet sprayed with non stick cooking spray.

OLYMPUS DIGITAL CAMERA

Place in the oven and bake for 20 minutes. Remove from oven and flip. Return to the oven for a remaining 8-10 minutes. Serve immediately!


Well I hope you enjoy these two very simple recipes to use Cauliflower as a side dish. Share with me your comments and feedback, as well as any questions or concerns. Hope you enjoyed this series on Cauliflower. Coming soon, I will have a series on Spinach, as well as Broccoli! Enjoy 🙂

Spice Up Your Cauliflower- Round 2- CHOWDER

Today, my recipe for you is Cauliflower Chowder. This chowder is low carb and satisfying, yet still has the hearty, creamy aspects of other chowders. This is actually whats for dinner at my house tonight… I’m excited.

cauliflower chowder fotor

This recipe is fairly simple to make, and reheats well! I have a hard time when it comes to using leftovers, so when I find a dish that reheats and tastes exactly the same as the first day, I’m happy.

Ingredients:

4 slices Turkey Bacon, diced

2 tbsp Butter

2 cloves Garlic, minced

1 Onion, diced

2 Carrots, peeled and diced

3 stalks Celery, diced

1/4 cup Flour

4 cups Chicken or Vegetable Broth

1 cup 2% Milk

1 head Cauliflower, roughly chopped

1 Bay Leaf

Garlic Salt & Freshly Ground Black Pepper, to taste

Instructions:

1- Heat a large stockpot over medium high heat. Add turkey bacon and cook until crispy, about 6-8 minutes. Transfer to a paper towel-lined plate; set aside.

2- Add butter to the stockpot over medium heat. Add garlic, onion, carrots and celery. Sauté, stirring occasionally, until tender, about 5 minutes. 

3- Stir in cauliflower and bay leaf. Cook, stirring occasionally, until tender, about 10 minutes.

4- Whisk in flour until lightly browned, about 1 minute. Gradually whisk in chicken broth and milk, and cook, whisking constantly, until slightly thickened, about 6-8 minutes.

5- Bring to a boil. Then reduce heat to medium and simmer until cauliflower is cooked, about 45 minutes. Season with salt and pepper, to taste. If the chowder is too thick, add more milk/stock as needed until desired consistency is reached.

6- Serve immediately, garnished with bacon and shredded cheese if desired. Serve with a slice of garlic bread or croutons, if desired.

Here is a link to your printable recipe card: Cauliflower Chowder

Give this chowder a try to add a twist to your plain Cauliflower. Let me know what you think! Enjoy 🙂

Spice Up Your Cauliflower- Round 1- PIZZA

I know, I know… Cauliflower… Blah, boring… Well guess what?!? I’ve got 3 recipes to change your perspective on Cauliflower. Over the next 3 days, I am going to share with you a series of blogs using Cauliflower! My family has always been a huge fan of Cauliflower as an easy side dish to cook along with a meal, but I’ve come up with 2 recipes that turn Cauliflower INTO THE MEAL and 1 side dish Recipe using Cauliflower.

Are you ready???

The first way to change up Cauliflower … PIZZA.

Cauliflower Pizza Collage

Yup, that’s right… Cauliflower Pizza. No, the cauliflower is not the topping. The dough of the pizza is made from Cauliflower!

Ingredients:

1 large head Cauliflower, separated into florets

3 egg whites

1/2 cup + 3/4 cup (for topping) Mozzarella/Tex Mex cheese, shredded

1 tsp Italian herb seasoning

1/4 tsp freshly ground black pepper

Pinch of salt

Marinara sauce for dipping

Any additional toppings such as pepperoni, mushrooms, onion, pepper, etc.

Instructions:

1-Preheat oven to 375 degrees F.  Place cauliflower florets in a food processor (I used a cheese grater, as I do not have a food processor down here in Mexico) and process until “rice” texture.

2- Bake for 20 mins in an oven proof baking dish. (Spray the dish lightly with non stick cooking spray to avoid burning and sticking)

3- Remove cooked cauliflower from the oven and transfer to a bowl lined with a dish towel (you can use paper towels also, but they do not absorb as well). Cool cauliflower for about 15 minutes. Fold the towel holding by the ends and squeeze the liquid out of the cauliflower “ball” as hard as you can. 

4- Increase oven 400 degrees F. Transfer cauliflower to a mixing bowl along with 1/2 cup cheese, and remaining ingredients.

5- Transfer cauliflower mixture onto the baking sheet sprayed with non stick cooking spray. Flatten with your hands into a 1/4” thick rectangle. 

6- Bake for 18 minutes, and then top with remaining 3/4 cup cheese (and desired optional toppings). Bake for another 10 minutes or until cheese is golden brown. Cut into breadstick sized slices and serve hot with warm marinara sauce.

Here is the link to your printable recipe card: Cauliflower Pizza

Cauliflower Pizza

Note: The photo above is a Cauliflower Pizza where half is only veggie toppings, and the other half is meat and veggies! 

So, what do you think? Want to give this a try next time you are wanting pizza? I’ve made this for my family and friends, and everyone has loved it. I made this dish for a little get together for some friends, and had I not told them it was cauliflower, they would never have known. All of the kids loved it as well! Give this a try and let me know what you think! Enjoy! 🙂